IT Training - The Blog

Thursday, May 28, 2009

Anchored Objects in InDesign

Q: In my InDesign document, I have a picture or text box in the middle of my body text with a text wrap around the object. But when I adjust the body text (e.g., font size, body text position), the picture or text box is no longer next to the original sentences in the body text (i.e. the object is out of sync with the body text). How can I fix that?

A: You need to make the picture or text box an anchored object.
  • Select the picture or text box with the selection tool
  • Cut the object (Ctrl + X)
  • Choose the type tool from the tools on the left
  • Place the cursor in the body text where you would like the object to be anchored to (i.e. when that part of the body text moves, the object will move with it)
  • Paste the object into the body text (Ctrl + V)
You are now free to manipulate the object (re-size and reposition) as you like, but now when the body text moves, the object will move with it!

Sign up for one of our classes to learn more about working with graphics in InDesign! Click here to register.

Wednesday, May 27, 2009

Alt + what?! You will love this shortcut

Quickly look up definitions and articles in Office 2007

This is awesome! Okay, so you are reading a document in Word, or you are making a PowerPoint presentation, and you come a cross a word you are not familiar with. Or maybe, while reviewing some Art History class notes you took in OneNote you come across a word that you need a little more information on, like Neoplasticism (see picture).
Okay, so you could go through the long tedious task of opening dictionary.com, or wikipedia, and attempting to retype the word Neoplasticism. Or, even worse, you could get an actual dictionary or encyclopedia, but I don't want to and neither do you!

So, here we go, hold down Alt on the keyboard and Click the word you want to look up!

The Research task pane opens in Office 2007 and gives you definitions, translations, synonyms, and articles from Encarta online (Microsoft's online encyclopedia). Take a look below for what I got when I Alt+Clicked "Neoplasticism."

Now go try it. Open your most commonly used Office Program, type in a word, hold down ALT on you keyboard, and then CLICK on the word. After you experience it, click here to sign up for our Office 2007 classes or our Computer Basics class. You will learn more great time-saving shortcuts.

Sunday, May 24, 2009

Online Suvey: How do you feel about online surveys?

What is Qualtrics?

Whether you are a department trying to meet the needs of students, or a student doing research for a psychology project, Qualtrics can make your life easier. Surveys are a simple and efficient option for getting information and opinions from people. With Qualtrics, surveys are made even easier because you can take care of everything online.

Qualtrics is web-based survey software that allows you to make custom surveys using any type of question you can come up with, including matching, ranking, drill down, likert, hotspots and constant sum questions. It then walks you through simple distribution and tallies your results. You can then have it generate tables and graphs of your data, and even run cross tabulations

BYU has received a multi-year grant from qualtrics, which means that if you are a BYU employee or student you can get a free online account. Once you have an account you can access it from any computer. If you want to learn how to use Qualtrics (or even just learn what all those question types do) sign up for our new Qualtrics class.

Friday, May 22, 2009

What-If Analysis - Goal Seek

What if you are trying to reach a specified result for a formula, but you do not know what the input value for one of the variables should be? Use Goal Seek to find the input value of the variable.

Example: You are trying to project net income for your business. You have projected sales revenue and expenses, but you would like to see if you can cut costs somewhere to increase net income (see income statement below).

What would administration expenses have to be cut down to in order to have net income of $100,000?

Use Goal Seek:
  • On the Data tab, select What-If Analysis and then Goal Seek...
  • Set cell: $C$7
    (we want to make net income our fixed result)
  • To value: 100000
    (the fixed result value)
  • By changing cell: $B$4
    (the unknown variable)
  • OK
Excel now plugs different numbers into cell B3 (Admin. Expenses) until C6 (net income) equals $100,000.

In order for this to work, the set cell and changing cell have to be linked either directly or indirectly through formulas or functions. In this example, Total Expenses is the sum of the three expenses/costs, and Net Income is the difference between Sales Revenue and Total Expenses. Also, Goal Seek only works when you are trying to find the input value of one variable.

Sign up for our free Excel class on data analysis to learn more about Goal Seek and other awesome tools! Click here to register.

Monday, May 18, 2009

Draw Table tool De-mystified

Recently I was preparing to teach a PowerPoint class and one mystery I needed to solve (and then teach) was the "Draw Table" tool in PowerPoint. I had been told that this tool allows you to draw a custom table, but how to do it was a complete mystery to me. This tool is located under the Insert tab and can be found by clicking on the "Table" button. One of the options on the menu is "Draw Table:"
Once you've selected this tool, the cursor changes to look like a pencil. Once this has happened, draw the border of your new table to your desired specifications. If you don't get it right, don't worry--you can always resize the border later.

After you've drawn the border, you'll notice that the only thing you've got now is a giant cell, which is more or less useless. But here's the exciting part!
Now, go back to the Insert tab and the Draw Table tool and select it again. The pencil cursor should reappear.

You can now use your pencil cursor to draw custom rows and columns within your table. You can also draw diagonal lines! In this way, you can create your own custom drawn table.

Once you are satisfied with the rows and columns in your new table, press the ESC key to get rid of the pencil cursor. Now you can use the regular formatting options to make your table look great and interesting.

There you go--Draw Table tool de-mystified!

Here is an example of an empty table that I created using the Draw Table tool:

Access Security Warning

Whenever you bring in a database from the internet or if you store your database on a network, you will get a security warning when you attempt to open the database in Access. It should look this:

Access is run by a programing language called visual basic (VB) and so there is a small possibility that there might be a virus embedded in the code of the database. By default, Access disables all of the "macros" (or bits of programing) so that there is no risk of a malicious virus taking over your computer. To enable the content, click on the options buttons and select the radio button entitled "Enable this content." If you don't enable the macros, some of your database's functionality will be restricted.

If you have any further questions, please sign up for our Access Foundations class!

Friday, May 15, 2009

Why Are Dates in Excel Off by Four Years?

Q: When I import data from one Excel workbook to another, why are the dates four years off?

A: Excel operates on two different calendar systems based on the years 1900 or 1904. If you experience the above problem, the two workbooks were set to different calendar systems.

To fix this:
  • Click on the Office Button in the top left corner of Excel
  • Select Excel Options
  • Select Advanced from the menu on the left
  • Scroll down to the section called When calculating this workbook
  • Check or un-check the check box next to Use 1904 date system

Click here to register for our Excel classes!

Thursday, May 14, 2009

What is Leading?

Contrary to popular concern about lead, leading is one of the most basic style options in Adobe InDesign. In Word, or other common software, it is referred to, and better understood as, Line Spacing - or the amount of space in between to lines of text. This post will not explain exactly how to set the leading, but you can learn how in our free InDesign Foundations class.

Where did the term "Leading" (pronounced "Led-ing," not "Leed-ing") come from? After some quick research on Wikipedia, I verified what I had previously learned from another instructor in our office. When type was set by hand on printing presses, "strips of lead...of appropriate thinkness were inserted between lines...to add vertical space." (see Wikipedia: Leading)

What an easy way to add space between lines! I guess you could just push enter a bunch of times...

Either way, sign up for an InDesign class and learn more about digital print layout!

Importing Brushes into Illustrator

Q: How do you import brushes into Illustrator?

A: What? You mean turn into this?


Be sure to sign up for our Illustrator class if you want the full explanation, but this post should get you on your way.

I'm glad that you've asked this question. Brushes in Illustrator are AWESOME and I think that Everyone should be able to use them to spice up their artwork. They're really simple to use once you have them, but sometimes getting them into your document can seem as challenging as creating your own artwork! But not to fear! In no time, you'll be joyously scatter-brushing with the best of them.

To start off, you need a set of illustrator brushes (Go to Google and search for free illustrator brushes and you should get a bunch of hits). Once you've downloaded a brush set, make sure that it's unzipped and saved somewhere safe on your computer. Sometimes, your web browser will save your downloads in temporary folders, so make sure that you move them to a folder that you can remember.

Illustrator brushes can be confusing because they can be saved in so many different file formats. some will be saved as ".ai" files (illustrator files) and if you just double click on them, they open up in a separate document. Others will be marked as .pdf or.eps or any number of extensions, but don't worry! The following steps should work. (If they don't then you might have a bum set of brushes... oh, and if your brushes are saved as a ".rar" file, it means that they were compressed with a special compression program and you'll need a special program to extract them.)

In illustrator, go to your brushes panel and click on the brush libraries menu in the bottom left. Select "other library."


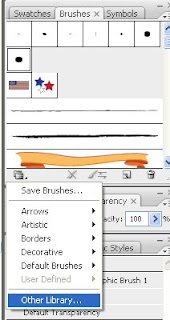
Navigate to where you've saved your brush pack and open it. Your brushes should open up.


And that's it! Have fun!

Oh, and if you want to learn more, be sure to sign up for our Illustrator class!

-Jonathan

Tuesday, May 12, 2009

Make Path from Selection

Q: Is there a way to take a selection (made from one of the selection tools) and turn it into a path? Or even just a way to define a path in the same way the magnetic lasso tool works?

A: Yes! Absolutely! It is actually quite easy. First, once you have a selection made, open the Paths palette (usually grouped behind the layers palette). Click the button that says "Make Work Path from Selection" (see picture below).Then, double click the new "work path" in the palette, and click okay. It is now a path!

Typically, paths are created with the pen tool. To use the pen tool like one of the lasso selection tools, click and hold on the pen tool in the tools palette, and choose "Freeform Pen Tool." Unfortunately, there isn't a way (at least to my limited knowledge) to use the Pen Tool in the same way the Magnetic lasso tool works. If you find out there is, please leave a comment correcting me!

To learn more about the many selection tools, including my personal favorite - the quick selection tool, click here to sign up for the free Photoshop Foundations class! It is sweet!

Friday, May 8, 2009

Adjustment Layers: Make other brides jealous

I got married two weeks ago today and am enjoying going through the MANY pictures taken of my sweet bride and I, as well as my family. One common thing that photographers will do with a picture of a bride holding her bouquet, is make everything black and white but the bouquet. This is very simple to do in Adobe Photoshop, and the video below demonstrates how. These skills and more are taught in our Photoshop Foundations Class. The class is free and usually meets two or four times over two weeks. To sign up for this, and other Photoshop classes, click here!

Wednesday, May 6, 2009

Locking Cell Formatting

Q I have a spreadsheet that is edited by student employees. I want them to be able to enter data, but not be able to change the formatting of the spreadsheet. Is this possible?

A The first step is to select all of the cells that you want users to be able to put data in. We then need to tell excel that once we lock the sheet, these cells should still accept data changes. To do this, go to the Home Ribbon->Cells Group->Format->and choose Lock Cell. (You’ll see that Lock Cell is already highlighted so by selecting it you are in effect “Unlocking” the selected cells.

Next we need to lock the entire sheet. Go to the Home Ribbon->Cells Group->Format->and choose Protect Sheet. Here you’ll want to make sure at least the first two options are selected. That’s probably all you’ll want to leave selected (make sure all of the format options are unselected). You can even set a password if you want to here, but make sure you’ll remember it!

That should do it! Now they can only insert data into the cells you specifically unlocked and they won’t be able to change any formatting.